I already found this connector on the web but this file have fault.
this file don’t have male & female plug. and cannnot connect each other.(there should be 4 connectors in one jack model for input & output, but this model only have 2 connectors.)
this jack is widely used on drone LIPO battery. so if you use LIPO battery for your project this jack is necessary on your PCB board. so I request this useful part.
The referenced Fritzing part is fine (it has no sex and thus can be used as either male or female.) In general connectors don’t “connect” in Fritzing although it is possible to make them do so with some work. Schematic in that part is missing terminalIds and thus the wire connects to the center of the pin which isn’t correct, but that is easy to fix.
Most of the examples in the referenced web page are not pcb mount but wires (and the referenced Fritzing part looks to have holes suitable for wires.) If you want a pc mount connector you likely need to select it and provide a data sheet with a mechanical drawing so a custom part could be made. With wires male or female doesn’t matter, nor usually will it matter with pc mount (but the spacing and size of the necessary holes does matter!) As to what a part needs to look like these two tutorials apply to the current version of Fritzing:
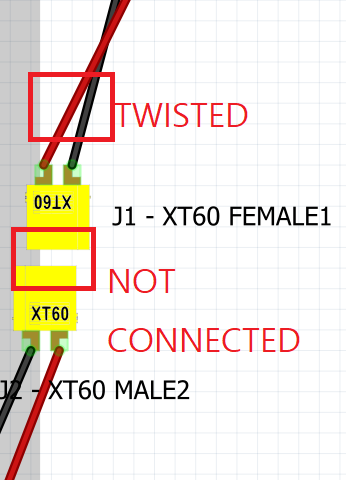
The twist is wrong. It connects positive to negative. The wires on the top connector need to be reversed so the black wire connects to the black wire on both ends of the two connectors. That has nothing to do with the part, the error is in the sketch.
As noted all the ones I see are configured to accept wires soldered to the connector, they are not intended to be pcb mounted. Thus all that is needed on pcb is a hole of a sufficient size to take the appropriate gauge wire. I assume (but did not verify) that the referenced Fritzing part has appropriate sized holes in pcb. You need to check the hole size from the gerber drill file to make sure the holes are big enough for the wire gauge in use.
Convention for connector names in Fritzing are of the form connector0pin, increasing by 1 for each new connector. They also need to match the definitions in the .fzp file for the connector. Making parts is a fairly complex process. You will probably need to use the tutorials to get it right.
OK. there was so much wrong with the part that I made a pair of new ones (one male one female.) In pcb the hole size was changed to 0.09in to fit 12Ga wire The original is much larger (perhaps to accept the entire pin!)