Hi there, is it possible to edit the appearance of a transistor so that only two legs are visible/present? It’s a reverse avalanche LFO situation and in practice; the base pin (middle) is snipped off. Trying to replicate this in the software, as accurately as possible.
If necessary, I’ll resort to removing the stripboard track beneath that pin. Compulsively however, that option would prove something of irritant.
I am currently using 2N3904, 2N2222, and S8050 transistors in my project. So NPN, or T092 would work.
How does one go about making the edits? I found the parts editor a little confusing. I removed the base pin from the Connectors tab, but I couldn’t figure out how to edit it visually. Probably looking at it too hard
Thank you for your quick response. This software is new to me.
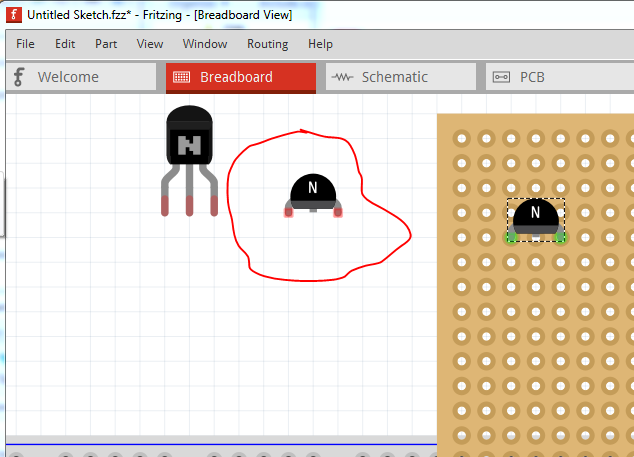
Unfortunately parts making is a challenge (it took me around a year and a lot of help from people in here to learn to do it.) Parts editor was not finished when development stalled in 2016 (development is just restarting now.) That means that parts editor won’t work with the transistors as they have bendable legs which it doesn’t support. In addition it sounds like you are working (at least in this case) with perf board and the standard breadboard parts don’t work well on perf board (they tilt at around 45 degrees usually and thus overlap other pads.) We have a class of parts called (usually) top view that are meant to be perf board friendly. In this case I started from a top view to92 NPN transistor created by @steelgoose (who taught me much of what I know and unfortunately hasn’t posted in a long time) and removed the bendable legs (both because I don’t like them, and they are hard to configure) and created this:
If you download the .fzpz file, in Fritzing File->open will load the part in the the mine parts bin ready for use. It looks like this in breadboard (with a standard npn for reference beside it):
If you are just starting with Fritzing I’d probably advise you to ask about new part for a while, but if you do want to make your own parts these two tutorials cover the current Fritzing version, most others are for older versions and may not apply any longer:
Wow. Thank you so much for the assistance, I truly appreciate it. I am eager to learn this program, and those links are of great help. In fact the problem I had when searching for Part Editor how-to guides was that the results seemed to come, consistently, with disclaimers of “This tutorial is outdated as of version…”. Or, at least, things to that affect.
My recent experience with help forums (an audio project one) has been pretty cold, and unwelcoming. This, however, has been entirely refreshing