CNC screenshots tutorial with step by step as milling PCB generated in Fritzing (v. 0.9.3b), with Gerber files converted into G-Code with CopperCAM and finally milled with bCNC ( GRBL / Arduino ) command sender, autoleveler and g-code editor.
Great work… now I don’t have to figure it all out… I think you should add some pictures: the router routing it out and the finished product, the PCB all routed out…
You really don’t need to plunge them, they should route just deep enough to remove the copper. I was thinking of using a down-cut, it would have a cleaner cut and you wouldn’t have any burs… but, just light sandpaper will take them off anyway. I guess the reason for the tapered bits is to keep the routing as narrow as possible and compensate for versions in the board not level. With a flat tip router bit you could cut the copper and barely skim the board… That is if the board is perfectly level.
I had to look up down-cut mill. and it looks like a slot drill - 2 words for the same thing -. End mills usually have a dead spot in the centre that doesn’t get cut. Then when you move to the side it takes a lot of force to move it before the centre bit is gone. Not that it matters here, but End Mills can only plunge 3mm before the centre hollow bottoms out.
Down-cut you usually plunge on an angle or start on the edge, but here you are only talking about a couple of mils… Normally down-cut are used when routing all the way through the substrate… When I sold my equipment, I keep all the little router bits thinking that some day I will build a small tabletop router… Them little dudes ain’t cheep… I will have to blame it on @asasergio, he has got me thinking about it again…
I am not a machinist, we did not use a lot of end mills. I was in the cabinet making / woodworking / mill work, store fixture, and Trade Show exhibit business. We used machining centers and table routers. Different kind of tooling for different material… Mostly hardwood, MDF, and different types of plastics. When cutting stencils out of 1/16" PVC I would rout slots about 1/8" deep in a sheet of MDF the same pattern as the stencil to catch the chips… The 1/16" PVC was laid on the MDF held down with vacuum pulling through the MDF, using 1/6" plastic-cut down-cut bits to help hold the the PVC to the table. An up-cut would tend to lift the small part parts off the table.
We would also use down-cut bits on veneer-ply to prevent chipping or splintering…
Note: They are call plastic-cut as the geometry of the bits are especially designed for cutting plastic. They have this geometry down to a science… Every material cuts different and have router bits with different geometry.
MDF is porous, you can pull a vacuum through it for holding down materials…
For PCB routing, they are very small bits (0.1-0.15mm bit is 60 degrees. The 0.2-0.5mm is 90º). I suggested these bits because this is what this company does… They make routers and software just for routing PCBs. I assume they know what they are doing and what works best… that is why they sell them. They have a shopping cart, just order online.
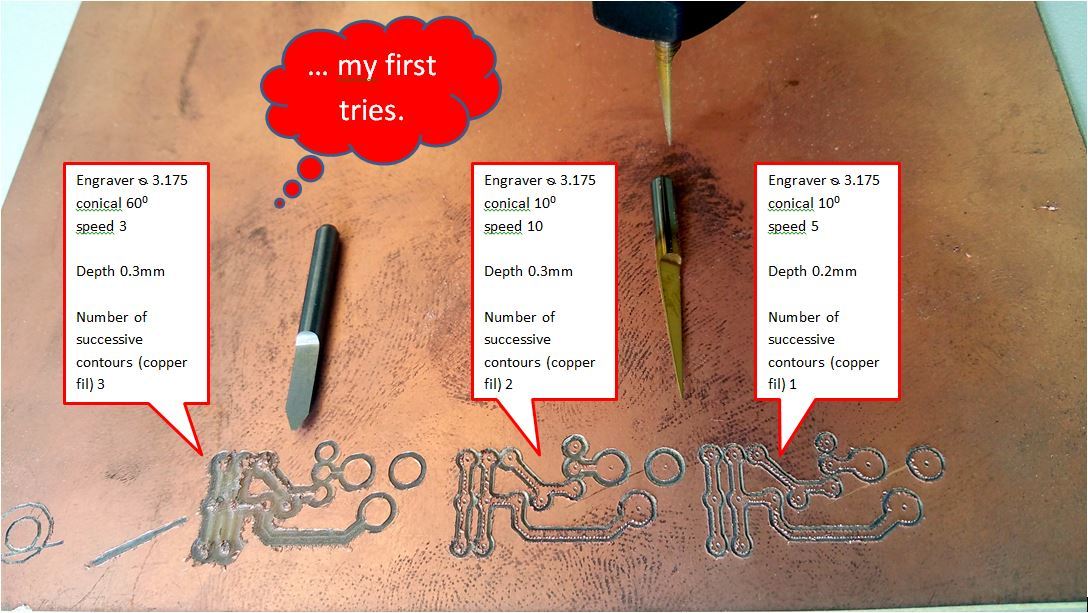
I was going to say those test cuts look a bit tear-y, but the link with the oil looks good.
I use the toner transfer chemical method, and it’s pretty good. To get the drill holes centred accurately when drilling free hand I put a 0.5mm via on every connection, and that centres the drill quite well. A 0.8mm etched hole can let the drill start on the side, but 0.4/0.5mm pulls it to the centre. I even toner transfer the silkscreen, which helps a lot when you have lots of parts.
![http://shop.gbrengineering.com/ekmps/shops/7002bc/images/20mm-hss-2-flt-autolock-slot-drill-mill-cutter-3012012000-europa-clarkson-1-[4]-5968-p.jpg](http://shop.gbrengineering.com/ekmps/shops/7002bc/images/20mm-hss-2-flt-autolock-slot-drill-mill-cutter-3012012000-europa-clarkson-1-%5B4%5D-5968-p.jpg)