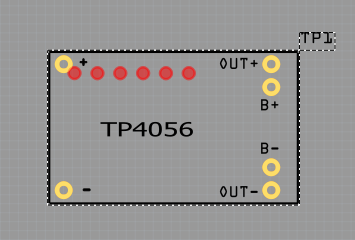
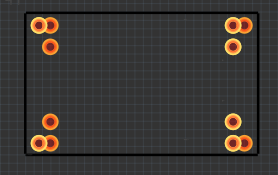
Managed to do it. I have tried to edit the pcb SVG in Inkscape, by downloading it and editing it, but then when I resave it all the layers seem to have moved around. So it would not reload. This is the SVG I have redone and moved the pads and labels around. I had to resize the board as that was wrong, but now should be correct. As I said earlier the pad spacing on the right are 2.54 mm and not 3mm which would be more correct for the actual board. However I am using the part to place the holes on my pcb and the attachment will be by pin headers.
The correct way to remove a part is remove it from the bin inside FZ, otherwise you have to search and chase instance inside the file system.
Yeah you didn’t follow the FZ layer rules for PCBs. Go watch my PCB video if this doesn’t make sense.
You make a group called silkscreen and put all lines and text in it.
Make a group below that called copper1(top copper), and in that make copper0(bottom copper), and in that put all contacts. With round contacts the OD is the size of the pad, and the ID is the size of the hole.
If this part will be fitted to a custom PCB that you are making, make the header pins 3mm apart and just install individual pins in each hole.
Many thanks for that. It’s starting to make sense. I think I have the right layers, but when I change one layer it seems to change others, so seem to have got myself in a right muddle. Could someone look at this SVG and see what I have done?
Thanks for that Old_Grey, but somehow the connectors seem to have stayed where they were and not moved with the copper layer. Not sure what layer they are on? Here is an image of what comes up when I load the part. Any ideas?

Mine is fine except for the fonts. You have to xml edit it and remove the px in the text sections.
Put a a 6pin header on the PCB and Edit it and add the svg and save as a new part.
I managed to get the connections sorted but the fonts suddenly went really small. Also I added the part initially to the top layer of my pcb, then rotated it 180 degrees and moved it to the other side. The connections all moved correctly but the copper pads stayed where they were, so I ended up with two lots of pads.

Not sure what you mean by removing the PX. For instance the Style for OUT + is showing,
font-size:1.57729566px;font-family:OCRA;fill:#000000;stroke-width:0.42061219
How do I change that to make the font bigger?
Your one worked sort of. Top view it loaded properly. Then I rotated it 180 degrees and moved it to the bottom at which point it reverted back to a 6 pin generic header.  So I tried it by moving my view to bottom and then added the board. It worked no problem and didn’t have to rotate it. Why it is doing what it is doing is beyond me, but for now it’s working.
See the px
font-size:1.57729566px;font-family:OCRA;fill:#000000;stroke-width:0.42061219
Remove the px
font-size:1.57729566;font-family:OCRA;fill:#000000;stroke-width:0.42061219
The part above has been fixed for fonts and works fine. You can get the svg out of that if you need it.
Tried that and it won’t let me save it like that. It automatically put the px back when I pressed Set.
You can’t do that in INK, you need to do it in WordPad. XML edit it
It doesn’t matter now I’ve put it in Peter’s part.
Here it is - TP4056-2.fzpz (11.6 KB)
Finally got there with your much needed help. I think I need to stop trying to design my project and start playing with Ink. That way I might get to work it a bit better. I know how to work Corel Draw better, but no matter what I do I can’t get draw to do what I want it to do and it keeps adding stuff in XML I don’t have a clue what it is. Computers will be the death of me yet. 
Use whatever vector package you like, we only use INK because it free.
I know my instructional vids will take half a day to watch, but you will save 10x as many hours than fumbling around. I don’t do any computer stuff these days without spending days watching tutorial videos because everything is complicated. Even similar programs have their own individual foibles so knowing one won’t help you with another. I would’ve spent 10hrs each on FZ, KiCad, Altium, and Eagle before I decided to go with FZ.
As Old_Grey said we use Inkscape because its free (and in my case because being free, its the most likely thing for other people to be using, so knowing its quirks is helpful). Corel Draw works fine, in many ways better than Inkscape I think. I’m working on a python script that will remove the px from font size and do a variety of other things that Inkscape does that Fritzing doesn’t like but it isn’t quite ready for release yet.
Peter
Don’t get me wrong I think Fritzing is great and look forward to your new script Peter. I agree Ink is good and even better because it’s free, but like all new programs takes a bit of getting used to. I use Corel 12 which is a good few years old now so Ink is maybe ahead of 12 in many respects. PCB design is also new to me so learning lots as I go. My main interest is brewing beer, and love tinkering, hence my current project. Many thanks to you both. You have been very helpful in pointing me in the right direction. 
As always this has been interesting and educational  , turns out the text problem is nested tspan text groups (and the incorrect fonts). I’m not sure how you got the nested tspans (most likely something Inkscape did for reasons unknown) but fritzing doesn’t like them. I’m adding a test for that and non supported fonts to my script …
Peter
Many years later, but I cobbled this together from the previous posts.
Has a nice breadboard, schematic, and pcb view
TP4056 Charger.fzp (4.0 KB)
Many thanks. I’m sure it will be useful…
Bob